Thursday, April 29, 2010

Complex Cane Pins

I still have canes leftover from a Jana Roberts Benzon workshop from two years ago; even after making tons of pins.
I made the above pin at one of our Guild's four day retreats. The transparent polymer burned because the oven was too hot, but I liked it anyway.
Another pin using my leftover cane from the complex cane workshop.
And even tucking in a teeny tiny butterfly on the side of another pin.

Wednesday, April 28, 2010

Little Tussie Mussies

More air dry polymer clay flowers, leaves and buds arranged in a small vase pin.
They are called lapel pins or boutonnieres.
I like mine overflowing.
I like adding sparkle with pearls and crystals and ribbons.
They are just sweet reminders that May flowers are just around the corner.

Tuesday, April 27, 2010

Air Dry Polymer Flowers

This is a short, but sweet post today. Just a couple of pins of made from air dry polymer clay. I beaded and wired some little baby's breath and glued them among the leaves. Added some gold cording and red velvet ribbon and have received lots of compliments on it.
This is a small pin with one sweet rose nestled among the tiny flowers, buds and leaves. These pins are so lightweight, it is unbelievable.
Sculpey Light is a good brand to try and so is Makins. You just need to have everything laid out ahead of time as you need to work quickly. The clay air drys in a matter of minutes, so you need to be prepared to work quickly. It really is a lot of fun. More tomorrow.

Monday, April 26, 2010

Portable Bead Crochet

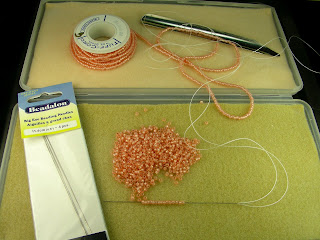
My trusty polymer clay covered crochet hook (which makes it easier on my hand), my Tuff Cord, bead stopper, beads and matte board. I toss these into a zippered pencil bag and I'm off.
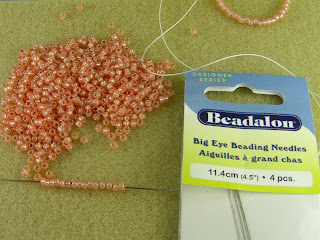
I use a 5" Big Eye Beading Needle from Beadalon to string my beads onto the Tuff Cord. I have a bead spinner, but I really like doing it this way because I can cull through my beads as I string them on.
This is a small Huggies Wipes container that I glued velour to the insides.
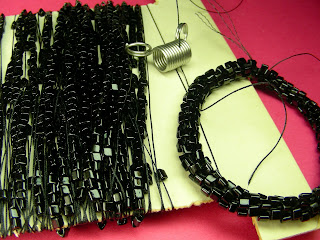
You can see in the above photo the damaged beads that need to be discarded. I try to cull through my beads before I pick them up, but checking them on my needle is really the easiest for me. You definitely do not want any damaged beads in your bead crochet as they will throw everything off. They can also shred your stringing material over time and compromise the integrity of your piece.
If you purchase a bead crocheted necklace or bracelet, always check where it is joined or the two ends to make sure they are neatly done. Each bead should sit neatly on top of the one below it in a spiralling pattern. The first three or four rows are extremely difficult to start, so always check the beginning and end. Bead crochet is addictive once you learn it. The initial stringing on of all the beads, culling through them and then starting are the hardest part, after that, it is pure fun.

Saturday, April 24, 2010

Finishing Your Carved Piece

The photos at the end of this post show my original thought of beaded dangles, lots of beads, disks and fibers. However, these two photos show my final decision. Simple black cording, sliver closure, a few fibers and that's it.
Below: I was really trying to make it work. I thought if I used my polymer river rocks it would help it. Nope, still didn't like it.
It was just too busy.
Too much going on and the pendant got lost. It was a fun process finding my way to "keeping it simple". So, give carving a try. You will love having your own stamp, your own design from polymer.
I have made several over the years and they have held up beautifully. Have to say I like the disk beads a lot and will have to figure out how I can use them in another piece.

Friday, April 23, 2010

Carving Your Own Stamp Continued

You are going to "stamp" your carving into conditioned clay. I chose a dark scrap clay because I knew I was going to paint it, but you could choose whatever color or blends of color you want. I sprayed my carving with a mist of water and then laid it on my conditioned clay and gently pressed down.
Lift your rectangle off and there's your raised carving! Use your cutting blade to cut your pendant shape or use an aluminum cutter. I preheated my oven and baked my piece at 250 degrees for 45 minutes.
I made a bunch of disks and circles to match-just in case I wanted to use them in my necklace. I used a yellow ochre to highlight the high spots and decided I did not like it.
Then I rubbed Titan Buff all over it and wiped it off. I painted the face darker using Payne's Gray acrylic paint and water. Yeah, I was liking it much better; my little ancient primitive pendant. Continued tomorrow.

Thursday, April 22, 2010

Carving Your Own Stamp

I did a couple of sketches (below) and got out my polymer. Conditioned it and ran it through on the thickest setting on the pasta machine.
Cut a rectangle. Preheated my oven, baked my rectangle for 45 minutes and gave it an ice bath when it came out of the oven. You can use a pencil to sketch on your polymer or you can free-hand it. I used my linoleum cutter (polymer handle) to gently carve on the lines. Move your piece as you turn corners, not the lino cutter.
I wanted a primitive piece. Ancient, no modern.
Continued tomorrow.

Wednesday, April 21, 2010

From OMG to Organized

My clean, organized studio.
My clean, organized beads. I have only gone through half as I got really tired.
Why did I get tired? Because I made a huge mess on my worktable. I went through every container. Patted myself on the back because I did a good job so far.
Lots of bags and tubes of beads and buttons that I was able to sell to a lady who lives here in my community.
Remember the Nest bracelet? It was unbelievably difficult to cut up. I stitched that thing like it was a real nest. Anyway, it's bead soup now.

Tuesday, April 20, 2010

More Treasures Unearthed

Still sorting and reorganizing and unearthing treasures from the past. Look at these beauties! Old, pre-thirties, Monte Carlo Casino Chips. "Societe Des Bains De Mer" means "company of the sea bathings". It's bakelite and the one below is Celluloid.
I found these over 20 years ago and, again, packed them away because "someday" I was going to make a Las Vegas gambling bracelet to bring me some luck. I didn't think they were real or had any value.
I researched them on the Internet and will see what I want to do with these after I get back from New Mexico at the end of the month.
They are so pretty and in great shape for as old as they are.
Monaco was a very small and impoverished country when Prince Charles III introduced gambling as a source of revenue in 1866. Within 3 years this new source of income became so rewarding that direct forms of taxation were eliminated. To accommodate the burgeoning tourist business, a new casino was opened in 1904 called the International Sporting Club. And in 1975 Loews Corporation opened an American style casino.
So there's your history lesson for the week. Going back to my table to make a huge mess. I am going to be going through my seed beads and, much like cleaning a closet, I plan on just completely emptying my bead drawers onto the table and start sorting. This could be a mistake.

Monday, April 19, 2010

Barbara McGuire Workshop

When I was sorting through and downsizing my bead stash, I came upon these. They are from 2000. I took Barb McGuire's workshop at Carolina Moon in DesPlaines, Illinois. We were wire wrapping little "music" wraps on all our pieces.
This was a workshop on how to wire wrap, use texture sheets, create faux mother of pearl, necklace and earring design and construction and using powders.
Above is what I should have gone home with, but got so carried away with shapes and powders and wire wrapping, I never finished.
This was a different shape I was trying.
And different textures. This particular workshop was really great because we all arrived early, bought our supplies at Carolina Moon with the help of the store owner and Barbara, went into the classroom and went through everything we had just purchased.
Above are more I made before leaving that class. Barbara McGuire shares her knowledge, tools, materials and stories. I used every one of her texture sheets. I must have look really funny sitting in the back just mass producing these while everyone else was constructing their necklaces. I was fascinated with this whole process. But my fascination ended as soon as I got home when work and life took over. Here we are ten years later. It was like opening a present when I came upon these. I never did seal them, so I think I am going to play around with them and take them one step further. And yes, finish the wire wrapping.

Sunday, April 18, 2010

Pendant From France!

My first package from France! So excited! I saw this gorgeous polymer pendant featured on Cynthia Tinapple's Polymer Clay Daily on March 29th and had to have it.
It is by polymer artist Dumauvobleu. You can see more of her work on her Flickr site here.
It is a large pendant, measuring 2-1/2" x 2-1/2", but is surprisingly lightweight. I am fascinated by her technique and will really enjoy wearing my new gift from France!