Thursday, September 29, 2011

What Has 4 Legs, Striped Stockings and Ugly Shoes?

Twin Witches. What do you say when you see twin witches? Which witch is which? hehe. My dining room table is transitioning for Halloween. Thanks to treasure hunting at Good Will, I was fortunate to find 2 pairs of "witchy-type" shoes for all four dining table legs. Good Will now has an entire section of new Halloween costumes and decorations, so I was able to purchase the stockings there also. Most stores carry the striped witch tights, but the stockings or thigh-highs fit the table legs much better, so I was happy to find them at Good Will. Details, details. Witch Legs aren't pretty you know, so they needed a bit of ugling-up. Above was my inspiration. I saw this on Bubblegum and Duct Tape (click HERE) and knew I had to have it. They actually cut or drilled a hole through the heel of the shoe so the square leg would sit evenly on the floor. My dining table legs curve out and narrow at the bottom and sat flat in the shoe on the floor so I chose not to cut a hole. Tomorrow, some bathroom decorating. I have found some fun Halloween decorating sites....just click on the "Free Tutorials" on my sidebar and click on the Halloween board.

Tuesday, September 27, 2011

Scarrot N. Run

Meet Miss Scarrot N. Run. I sculpted her in polymer clay and painted her in acrylics. I added the pretty bows and her growing "roots". I thought she was pretty scary. But with a fun side to her too. Oh yeah, she's ready to partay! She'll most likely be stewed by the end of the night! Did you just groan?

Monday, September 26, 2011

Bottle Top Cakes

Remember the molds I made from the bottom of plastic bottles (click HERE)? Well, why not the lids? The little cakes in the back row are finished, but I am still working on the rest. This is air dry polymer clay applied over various plastic lids. When fully hardened, I decorated some with hand sculpted air dry polymer clay roses and leaves and some with dimensional paint. I remembered that I had done a demonstration on various brands of air dry polymer clay and dug these out. OK, two more areas (maybe 3) of a plastic bottle to experiment with. The hubby keeps walking by me, shaking his head, saying, "Stop already".

Sunday, September 25, 2011

Beaded Sculptural Piece

Above shows the detail of the using peyote stitch to build small walls giving it a 3-D effect. This one is finally done. I'm happy with it. I usually have one or two of these beaded free form pieces going and when I'm in the mood, I can pick one up and not worry about where I left off in a pattern. I have one that I started 3 years ago and am still working on. I do like structured pieces, but abstract, free form art just makes my heart sing.

Saturday, September 24, 2011

Free Form Crocheted Necklace

I took a little break from goblins and ghouls and created a quick free form crocheted necklace. It's dramatic, large and light as a feather.

Friday, September 23, 2011

I'm Baaaaaaack

I'm working on more Skeleton Crew pieces, but thought these would be worth posting again. Ahhhh, good memories. When I make another one of these canes, I will add more white around the chin area. The outside of a cane loses the most clay (definition) in the reducing phase so it is better to over-pack than under-pack. I'm off to have some Boo-berry pie. C'mon, can't let a day go by without some little pun fun.

Thursday, September 22, 2011

Free Tutorial Silicone Mold & Truffle Recipe

You HAVE to see this. These are Chocolate Walnut Truffles created by Marc Brownlow. That's not the amazing part. This is. He hand sculpted the skulls from polymer clay. Then made a form to pour a silicone mold into. Made the silicone mold of the skulls. Made the white chocolate truffle mix, poured it into the silicone molds, removed them from the silicone molds after they were set, made the walnut candied "brains" and voila! Halloween truffles. So, go to the site "Figs With Bri" (click HERE) to learn how to make a "pour in" silicone mold. I mean, each step is a work of art. He is unbelievable. I loved reading how he wanted to create something that wouldn't be gobbled up, but something that his friends would savor. He and his mother have maintained the site in honor of his wife, Bri's death from cancer in 2008 at the age of 32. He encourages all to savor each day, each moment, each bite.

Wednesday, September 21, 2011

Free Tutorial for Wreath

This is Elizabeth Goodman's tutorial (click HERE) on To Be Charmed. I like the idea of just spray painting a green wreath black. I also like the cutouts, but I am thinking I want to use the bats from yesterday on this wreath. Will figure it out. Extra treat: Halloween Tip Nut (click HERE) has an entire page of tutorials for boo-tiful Halloween wreaths.

Tuesday, September 20, 2011

Free Tutorial Polymer Bat Mobile

Thomas Ojeda shares his free tutorial for the above polymer clay bat mobile on PC Polyzine (click HERE). I know I am going to make these, but have plans on using them on something else, which hopefully I will get around to posting next week. So, get busy and Bat this one out of the park.

Monday, September 19, 2011

Free Beaded Bat Earring Pattern

Don't go out for a bite, hang around for a while and take a look at this free pattern from Vicki Star (click HERE). If you love tiny amulet bags, Vicki Star's site is the place to go. Take a look at her other freebies while you are there. The bat earrings are done in odd count peyote stitch. I have not made these yet, but thought you might like to make a pair before the slowly approaching All Hallows Eve. You know how to hold a bat don't you? By it's handle. That one snuck up on you didn't it?.

Sunday, September 18, 2011

Free Tutorial Polymer Candy Corn

This free tutorial comes from Crafts-For-All-Seasons (click HERE). Sit for a "spell" and enjoy their site. Here's a little ditty before you go: The other day, I was walking through the cemetery looking at headstones and saw this one, "Here Lies Johnny Yeast, Pardon Me For Not Rising". Wipe that pump-grin off your face; here comes another: "She always said her feet were killing her, but no one believed her".

Saturday, September 17, 2011

Free Tutorial for Polymer Holder

This is Jill King's free tutorial posted on 365 Halloween (click HERE). It is a Photo holder, but how cute for place cards, food description cards, reminder notes, etc. Off I go a haunting....... looking for more "How To" treats to fill your creative Halloween bags with.

Friday, September 16, 2011

Following, Subscribing and...

I've had some emails asking about the 300 cutoff for following. Here's the link where I read it (click HERE). I subscribe to Nitecruzr because it has the latest on what is happening on Blogger. OK, I'm done with the longest post since the birth of my blog. Whew.

Following and Subscribing

I follow an average of 300 blogs (mostly polymer clay). Out of that 300, a little over a third follow me back. It took me quite a while to learn that it was a "given" in blogland to follow someone who is following me. I didn't realize it was a common courtesy. My bad. But because I follow an average of 300, I have to delete those who have not followed me back within a year so I can make room for new ones that do. Blogger allows you to follow around 300 before it automatically drops some of your followed sites. So I move my deleted blogs to my Google Reader RSS feed since I know they are not going to follow me, but I still want to keep up with them. I subscribe to over 900 blogs through Google Reader. They cover polymer, needlework, crafts, art, beading, mixed media, painting, photography and decorating. I have my coffee in the morning and scroll through them in less than a couple of hours (including my breakfast). Keep in mind it is rare for a blogger to post everyday. Some only post once a week, once a month or once every 3 or 4 months, so there are probably less than a couple of hundred to scroll through. I LOVE my mornings. I get inspired, stretch my imagination, embrace new concepts, learn, laugh, connect, etc. I can't wait to get up in the morning.

Thursday, September 15, 2011

More Free Polymer Tutorials

Cara Jane's page of free tutorials can be found HERE. Cara gave me a plug on her blog yesterday, so I am happily returning the favor. I enjoy her blog and polymer artistry; and she's fun too. I'm liking this idea of featuring followers' work. I haven't really done that much and the more I surf polymer sites (domestic and international), I'm finding brand new polymer artists with one or two followers or none at all. I'll show you what I mean tomorrow. I like being able to click on a follower's avatar (picture) and reading their profile, going to their blog, seeing who they follow and what art they do. It's a common thread connecting all of us. Followers keep the polymer community going. So cool. I loved finding the tutorial photo directory yesterday and sharing it. Plus I "pinned" a ton of tutorials to my Pinterest board (click HERE). I am really enjoying the ease of hitting one button to put a polymer tutorial on my Pinterest board. I'm rambling, I'm tired.

Wednesday, September 14, 2011

TREATS FOR YOU

Inspired by ArtyBecca, Iratirita created these beads. I loved her interpretation and looked further into her blog. Oh my gosh, are you in for a treat. Iratirita has compiled a photo directory of tutorials that is astonishing. Love it and love following her! Thank you Iratirita! So here are the links for your treat bags. Tutorials Part 1 click HERE. Tutorials Part 2 click HERE. Just click on any photo and it will take you to the tutorial. Some are photo tutorials, some need translating, but most are in English. Have fun!

Tuesday, September 13, 2011

Free Polymer Pin Tutorial

I love this pin from Josh Burkhart. He shares his free tutorial (click HERE) on his site, Josh Clay. A cool cat sharing a cool cat. I'm pretty sure this black cat is full of good luck and, as far as Mr. Pumpkin, I hear he is on the cutting edge.

Monday, September 12, 2011

Polymer Jack Skullion

Jack Skullion who is always in some kind of stew; Is tall 'n lanky with an attitude. Wishes you a creative week, full of whimsy n' whim; with lots of imagination n' polymer clay on the menu! ....................................A Creative Bone Appetite! I sculpted him using ProSculpt. After baking and cooling, I painted him with artist grade acrylic paints and baked to set the paints. Drilled a hole in the top of his head, inserted some wrapped fibers, and Polymer Jack Skullion was born.

Sunday, September 11, 2011

In Memory

Deborah Pflanz designed this piece ten years ago. She submitted it to Beadwork.about.com as a free pattern (click HERE) saying, "I would like to submit this...just to remember and remind us and help us heal. Colors are...Red (for the blood of the victims), Navy Blue (for healing), White (that lights of justice and freedom still light our lives), Black (for the grief and horror we have all been feeling) and Yellow (to remember). For me, I find that even now, ten years later, there are no words.

Saturday, September 10, 2011

Free Beaded Witch Tutorial

Hang around for a spell, but not too long or you may be toad! Just long enough to check out Elizabeth Hackbarth's beaded witch tutorial on Beadwork.com (click HERE). When you are done batting that out, settle in for a good read. I've added a new book to my Halloween library and highly recommend it, "Witches On The Rise" by Ella Vader". It's spell-binding.

Friday, September 9, 2011

Free Beaded Spider Web Necklace Tutorial

I LOVE this tutorial. Beadalon's Blog brings us Margot Potter's free tutorial (click HERE) for a webbed necklace. I AM going to make this! When I don't know, but I am. Maybe in between my Spook-ghetti and Blood Lite.

Thursday, September 8, 2011

Free Sick Pumpkin Tutorial

This free tutorial is by Marie Young of Creative Sprinkle (click HERE). Poor sick pumpkin had too much Terror-misu!

Wednesday, September 7, 2011

Ricky D. Bones

This Regards A Grave MatterHere lies hypochondriac Rick - For once he was right when he said he was sick. I used polymer clay and acrylic paint and threw him in some "rocky" coffee beans. These are the supplies from Michael's Craft store I used for all my Halloween polymer fun. Ricky D. Bones is from the skeleton candy mold, the Batty Bookmarks are from the small aluminum cookie cutters and I used Sculpey's Glow In The Dark polymer clay. So go have a good breakfast of some Scream of Wheat and then go create something for next month's Halloween parties.

Tuesday, September 6, 2011

Ghoul Friends

It's the Ghoul Friend pins making their Ghoulish Entrance (get it? enTRANCE) The Ghoul Friends work the graveyard shift and, make no bones about it, they think it is the best. They look forward to going out after work to party, but, don't worry, they practice safe hex (get it? Safe hex-hexes, spells, incantations.). Try as I might, I could not get a photo of them glowing in the dark. But, I think you get the idea. I glued a magnet to each so they can be worn as pins without damaging clothing. I purchased a candy mold from Michael's craft store and used it for the base of the head. I sculpted a little on them and applied some of my canes before baking. After they cooled, I used acrylic paints to add more color.

Monday, September 5, 2011

Free Tutorial for Polymer Pendant

Get in the "Spirit" of things with this To Die For stamped pendant. This free tutorial comes to us from About.com. It is Kate Pullen's Glow In The Dark pendant (click HERE). I was inspired by her use of glow in the dark polymer and made some glowing skeleton magnetic pins which I hope to get posted tomorrow if I can get away from collecting book titles. Here's one of my favorites: "Things That Go Bump In the Night" by I. B. Clumsee. Oh yes, my friends, it is going to be a long Hallow-scream season.

Sunday, September 4, 2011

Free Tutorial-Beaded Candy Corn Bracelet

oops-here's the link to the tutorial (click HERE) Just checking if you're reading these. Candace Jedrowicz learned some new techniques while taking a workshop from Louise Fisher Cozzi (click HERE) in Italy. You can find Candace's free tutorial for her above polymer clay bracelet on Candace's blog, Spirit Clay (click HERE). Candace has shared her knowledge on several websites and tutorials on YouTube. Just Google her name for a list of delightful treats and take your pick of polymer tricks.

Saturday, September 3, 2011

Free Beaded Spider Tutorial

Time for a coffin break, so grab some Spider Cider and take a peek see. This spook-tacular beaded spider is from Tatertots and Jello (click HERE) who was a guest blogger on Craftilly Ever After (click HERE). Craftilly Ever After showcases guest bloggers. Oh yeah, almost forgot; the recipe for the adult version of Spider Cider is HERE and the kids' version is HERE. New book for my collection, "Don't Drink Yours Before Making The Kids" by Alex Blaine Laider (say it out loud).

Friday, September 2, 2011

Free Tutorial for Witch Fingers

I was inspired by the Witches Fingers (cookies) below from The Baking Pan. You can find their yummy cookies recipes HERE. I didn't want cookies so I went my own way. I used well conditioned ProSculpt polymer clay. I rolled a log, pushed in from the ends, pinched the area between where the knuckles would be, drew some lines on the knuckles. I added some bumps on the knuckles here and there and a hairy wart on one. To define the fingernails, I used the rounded part of some stainless steel measuring spoons I use for polymer. I baked the fingers and when they were cool, I painted them with acrylic paints. If you don't want to paint, start with a blend of an ugly color green polymer! 
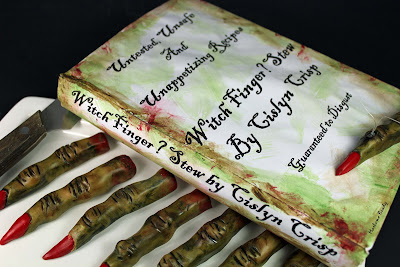
Another Halloween book for my gruesome collection. "Witch Finger? Stew" by Cislyn Crisp. Cover says, "Untested, Unsafe and Unappetizing Recipes" "Guaranteed To Disgust". OK, did you say "Cislyn Crisp" out loud? Get it? Sizzling Crisp fingers in the Stew? C'mon, you're going to have to work a little for these.